前后端分离服务部署示例
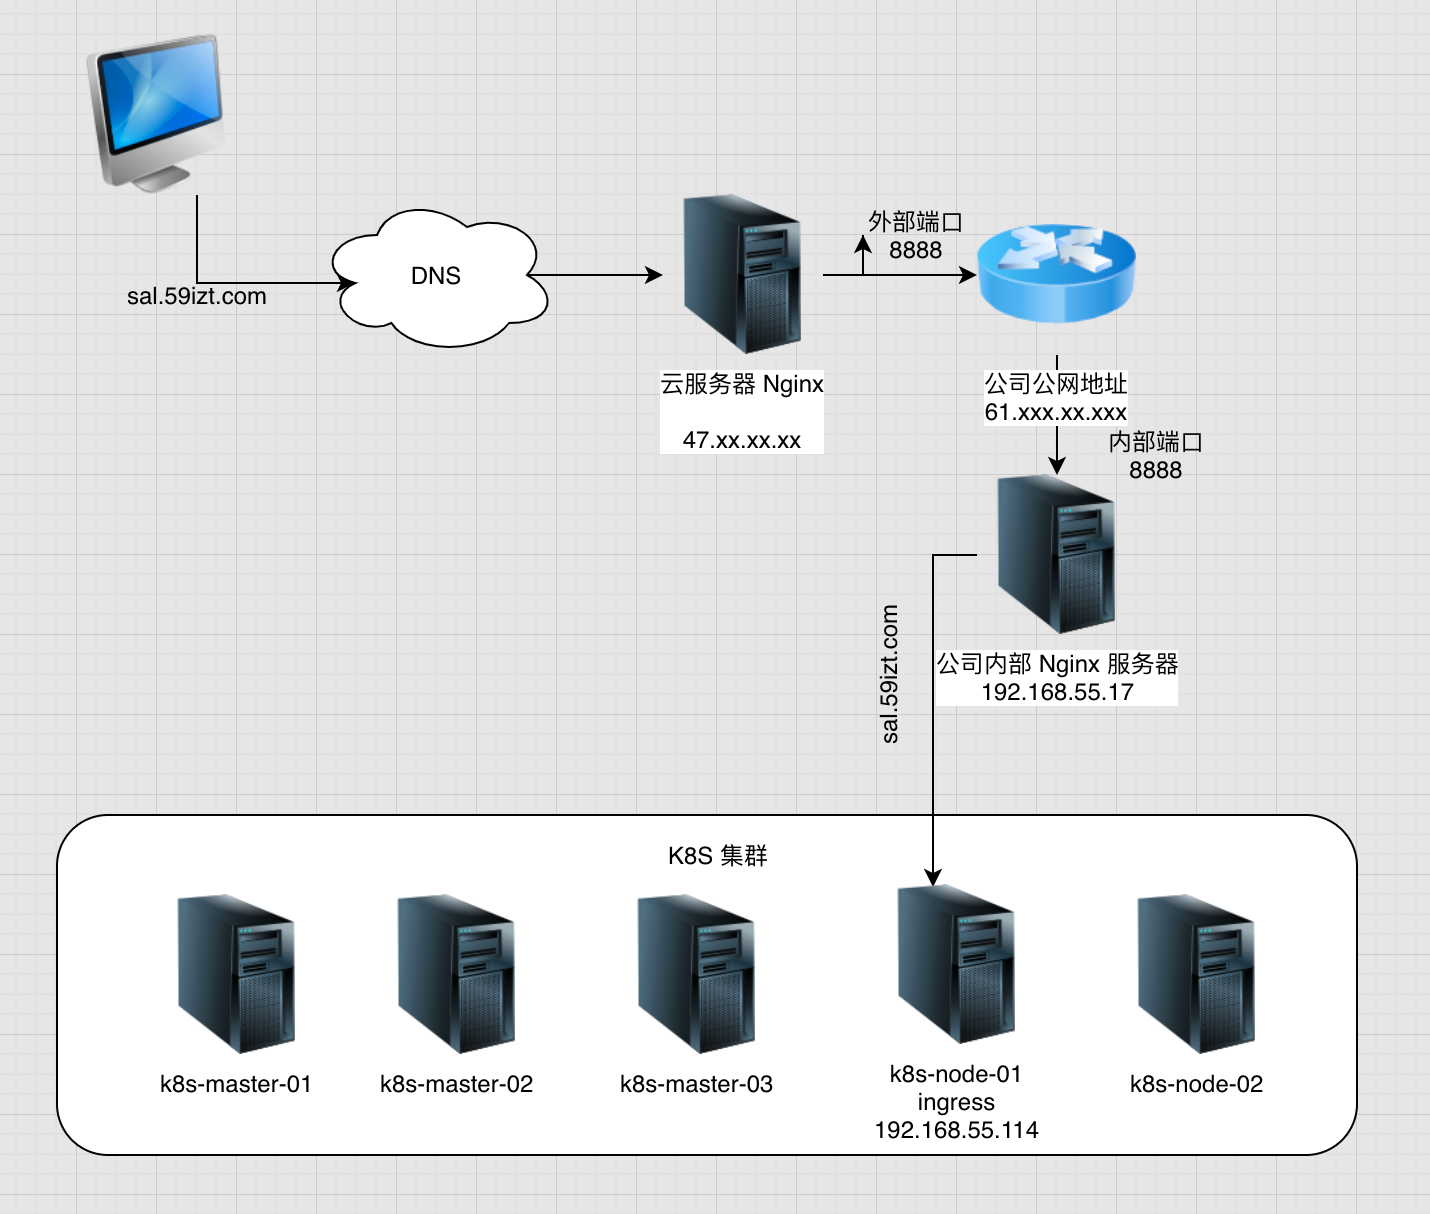
本示例架构如下图所示:
- 流量经过阿里云 Nginx 服务器,反向代理到公司公网入口路由器上;
- 在路由器上配置端口映射,将 8888 端口的流量转发到内部的 nginx 服务器上;
- 在内网 Nginx 服务器上配置请求转发,将所有请求主机为 sal.59izt.com 的请求转发到 Ingress-controller 所安装的主机上;
- Ingress 在将请求转发到 k8s 内部所在 svc 上,然后 svc 再将流量转发到后端的 Pod 上;

详细步骤
创建 ConfigMap
创建 nginx 配置文件,内容如下
1
2
3
4
5
6
7
8
9
10
11
12
13
14
15
16
17
18
19
20
21
22
23
24
25
26
27
28
29
30
31
32
33
34
35
36
37
38
39
40
41
42
43
44
45
46
47
48
49
50
51
52
53
54
55
56
57
user nginx;
worker_processes 1;
error_log /var/log/nginx/error.log warn;
pid /var/run/nginx.pid;
events {
worker_connections 1024;
}
http {
include /etc/nginx/mime.types;
default_type application/octet-stream;
log_format main '$remote_addr - $remote_user [$time_local] "$request" '
'$status $body_bytes_sent "$http_referer" '
'"$http_user_agent" "$http_x_forwarded_for"';
access_log /var/log/nginx/access.log main;
sendfile on;
#tcp_nopush on;
keepalive_timeout 65;
#gzip on;
include /etc/nginx/conf.d/*.conf;
# SAL 服务
server {
listen 9828;
server_name sal.59izt.com;
set_real_ip_from 192.168.64.17;
client_max_body_size 10M;
client_body_buffer_size 128K;
location / {
root /data/wwwroot/sal;
try_files $uri $uri/ /index.html;
}
location /v1/{
proxy_pass http://sal-backend-svc:9600;
proxy_send_timeout 1200;
proxy_read_timeout 1200;
proxy_connect_timeout 1200;
proxy_set_header Host $host;
proxy_set_header X-Real-IP $remote_addr;
proxy_set_header X-Forwarded-For $proxy_add_x_forwarded_for;
proxy_ignore_client_abort on;
}
}
}创建 ConfigMap
1
kubectl create configmap nginx-config --from-file=nginx-config=nginx.conf
创建 Secret
创建镜像拉取 Secret
由于镜像保存在私有镜像仓库,需要使用用户名和密码进行验证,所以需要创建 Secret 给 kubelet 进行使用
1
2
3
4
5
kubectl create secret docker-registry docker-secret \
--docker-server=habor.china-snow.net \
--docker-username=admin \
--docker-password='xxxxx' \
--docker-email=2350686113@qq.com查看生成的 Secret
1
2
3
4
5
6
7
8
9
10
11
12
13
14
15
16
17
18
19
20
21
22
23
24
# kubectl get secrets docker-secret -oyaml
apiVersion: v1
data:
.dockerconfigjson: eyJhdXRocyI6eyJoYWJvci5jaGluYS1zbm93Lm5ldCI6eyJ1c2VybmFtZSI6ImFkbWluIiwicGFzc3dvcmQiOiJzaGt6YzEyMyFAIyIsImVtYWlsIjoiMjM1MDY4NjExM0BxcS5jb20iLCJhdXRoIjoiWVdSdGFXNDZjMmhyZW1NeE1qTWhRQ009In19fQ==
kind: Secret
metadata:
creationTimestamp: "2021-08-30T07:00:02Z"
name: docker-secret
namespace: default
resourceVersion: "1842545"
uid: 53c0bf32-41a1-4532-a570-b846ab3fe55c
type: kubernetes.io/dockerconfigjson
# 或者使用 kubectl describe secrets docker-secret
Name: docker-secret
Namespace: default
Labels: <none>
Annotations: <none>
Type: kubernetes.io/dockerconfigjson
Data
====
.dockerconfigjson: 142 bytes
创建 HTTPS 使用的 SSL Secret
注:如果将证书放在 k8s 外部就可以跳过这一步,比如这里将证书放在 47.xxx.xx.xxx 服务器上;
获取 SSL 证书,这里使用从 DigiCert 处申请的免费证书
1
2
# ls
sal.59izt.com.key sal.59izt.com.pem创建包含证书和密钥的 Secret
1
2
kubectl create secret tls sal-ssl-secret \
--cert 6204480_sal.59izt.com.pem --key 6204480_sal.59izt.com.key注意: secret 名称不能使用下划线等特殊字符
创建资源清单文件
后端服务资源清单文件
sal-backend.yaml1
2
3
4
5
6
7
8
9
10
11
12
13
14
15
16
17
18
19
20
21
22
23
24
25
26
27
28
29
30
31
32
33
34
35
36
37
38
39
40
41
42
43
44apiVersion: apps/v1
kind: Deployment
metadata:
name: sal-backend-dev
labels:
app: sal
spec:
replicas: 2
revisionHistoryLimit: 10
progressDeadlineSeconds: 600
selector:
matchLabels:
app: sal-backend
strategy:
rollingUpdate:
maxSurge: 25%
maxUnavailable: 1
type: RollingUpdate
template:
metadata:
labels:
app: sal-backend
spec:
imagePullSecrets:
- name: docker-secret
containers:
- name: sal-backend-dev
image: habor.china-snow.net/sal-backend-dev:0.0.4
imagePullPolicy: IfNotPresent
ports:
- containerPort: 9600
name: sal-backend
protocol: TCP
resources:
limits:
cpu: 500m
memory: 1024Mi
requests:
cpu: 100m
memory: 200Mi
dnsPolicy: ClusterFirst
restartPolicy: Always
schedulerName: default-scheduler
terminationGracePeriodSeconds: 30后端服务 SVC 资源清单文件
sal-backend-svc.yaml1
2
3
4
5
6
7
8
9
10
11
12
13
14
15
16apiVersion: v1
kind: Service
metadata:
name: sal-backend-svc
labels:
app: sal
spec:
ports:
- name: sal-backend
port: 9600
protocol: TCP
targetPort: 9600
selector:
app: sal-backend
sessionAffinity: None
type: ClusterIP前端服务资源配置文件
sal-frontend.yaml1
2
3
4
5
6
7
8
9
10
11
12
13
14
15
16
17
18
19
20
21
22
23
24
25
26
27
28
29
30
31
32
33
34
35
36
37
38
39
40
41
42
43
44
45
46
47
48
49
50
51
52
53
54
55
56
57
58
59apiVersion: apps/v1
kind: Deployment
metadata:
name: sal-frontend-dev
labels:
app: sal
spec:
replicas: 2
revisionHistoryLimit: 10
progressDeadlineSeconds: 600
selector:
matchLabels:
app: sal-frontend
strategy:
rollingUpdate:
maxSurge: 25%
maxUnavailable: 1
type: RollingUpdate
template:
metadata:
labels:
app: sal-frontend
spec:
imagePullSecrets:
- name: docker-secret
containers:
- name: sal-frontend-dev
image: habor.china-snow.net/sal-frontend-dev:0.0.8
imagePullPolicy: IfNotPresent
ports:
- containerPort: 9828
name: http-sal
protocol: TCP
resources:
limits:
cpu: 500m
memory: 1024Mi
requests:
cpu: 100m
memory: 200Mi
lifecycle:
postStart:
exec:
command:
- sh
- -c
- "rm -rf /etc/nginx/nginx.conf && ln -s /mnt/nginx-config /etc/nginx/nginx.conf"
volumeMounts:
- name: config-volume
mountPath: /mnt/
volumes:
- name: config-volume
configMap:
name: nginx-config
defaultMode: 420
dnsPolicy: ClusterFirst
restartPolicy: Always
schedulerName: default-scheduler
terminationGracePeriodSeconds: 30前端服务 SVC 资源清单文件
sal-frontend-svc.yaml1
2
3
4
5
6
7
8
9
10
11
12apiVersion: v1
kind: Service
metadata:
name: sal-frontend-svc
labels:
app: sal
spec:
ports:
- name: http-sal
port: 80
protocol: TCP
targetPort: 9828Ingress 资源清单文件
sal-ingress.yaml1
2
3
4
5
6
7
8
9
10
11
12
13
14
15
16
17
18
19apiVersion: networking.k8s.io/v1
kind: Ingress
metadata:
name: ingress-sal
annotations:
# use the shared ingress-nginx
kubernetes.io/ingress.class: "nginx"
spec:
rules:
- host: sal.59izt.com
http:
paths:
- path: /
pathType: Prefix
backend:
service:
name: sal-frontend-svc
port:
number: 80
使用 kubectl 加载资源清单
加载后端服务相关资源清单文件
1
2kubectl create -f sal-backend.yaml
kubectl create -f sal-backend-svc.yaml加载前端相关资源清单文件
1
2kubectl create -f sal-frontend-svc.yaml
kubectl create -f sal-frontend.yaml加载 Ingress 资源清单文件
1
kubectl create -f sal-ingress.yaml
配置 Nginx 代理
在阿里云服务器 47.xx.xx.xxx 上配置 nginx 代理,sal.59izt.com.conf 配置文件内容如下:
1
2
3
4
5
6
7
8
9
10
11
12
13
14
15
16
17
18
19
20
21
22
23
24
25
26
27server {
listen 80;
listen [::]:80;
listen 443 ssl http2;
listen [::]:443 ssl http2;
ssl_certificate /usr/local/nginx/conf/ssl/sal.59izt.com.pem;
ssl_certificate_key /usr/local/nginx/conf/ssl/sal.59izt.com.key;
ssl_protocols TLSv1 TLSv1.1 TLSv1.2 TLSv1.3;
ssl_ciphers TLS13-AES-256-GCM-SHA384:TLS13-CHACHA20-POLY1305-SHA256:TLS13-AES-128-GCM-SHA256:TLS13-AES-128-CCM-8-SHA256:TLS13-AES-128-CCM-SHA256:EECDH+CHACHA20:EECDH+AES128:RSA+AES128:EECDH+AES256:RSA+AES256:EECDH+3DES:RSA+3DES:!MD5;
ssl_prefer_server_ciphers on;
ssl_session_timeout 10m;
ssl_session_cache builtin:1000 shared:SSL:10m;
ssl_buffer_size 1400;
add_header Strict-Transport-Security max-age=15768000;
ssl_stapling on;
ssl_stapling_verify on;
server_name sal.59izt.com;
access_log /data/wwwlogs/access_sal.59izt.com.log combined;
location / {
proxy_pass http://61.xxx.xxx.xxx:8888;
proxy_set_header Host $host;
proxy_set_header X-Real-IP $remote_addr;
proxy_set_header X-Forwarded-For $proxy_add_x_forwarded_for;
proxy_ignore_client_abort on;
}
}以上配置,将 sal.59izt.com 相关的请求代理到公司固定IP上的 8888 端口,并配置了 HTTPS 证书
在公司入口路由器上配置 8888 端口映射到内网的 Nginx 代理服务器
192.168.55.17:8888上在内网 Nginx 服务器上配置反向反向代理,sal.59izt.com.conf 文件内容如下
1
2
3
4
5
6
7
8
9
10
11
12
13
14
15
16server {
listen 8888;
server_name sal.59izt.com;
access_log /data/wwwlogs/access_sal.59izt.com.log combined;
set_real_ip_from 47.106.189.204;
location / {
if ($Host = "sal.59izt.com") {
proxy_pass http://192.168.55.114;
}
proxy_set_header Host $host;
proxy_set_header X-Real-IP $remote_addr;
proxy_set_header X-Forwarded-For $proxy_add_x_forwarded_for;
proxy_ignore_client_abort on;
}
}该配置让 Nginx 监听 8888 端口,并将请求主机为
sal.59izt.com的请求转发到 k8s 内部 Ingress-controller 所安装的节点上浏览器测试访问
https://sal.59izt.com,测试是否正常访问服务
